Wednesday, April 25, 2012

Creating SOAP and REST services for opentravel messages

I'm going to show you how easy it is to write a web service to access a travel product using open source software.

There are two parts to every software project.

First, you have to write the business logic. For example, return the price of a tour on a particular date. This is the fun part.

Second, you have to set up all the extra stuff to make your software work. Web servers, SOAP and REST configuration, etc. This is a pain.

By leveraging open source software, you can minimize the painful part.

For this example we'll assume that you are a local sightseeing company. Your customers want to be able to access real-time pricing and availability for all of our tours.

They use the opentravel 2012A Tour Activity Availability message pair using SOAP over HTTP.

This means you need a web server, a SOAP processing module, and a schema parser, as well as your code. Luckily open source software does most this.

If you're impatient and you just want this demo up and running with a just a few commands, click here for the schema library rest example.

I've created a template for your sample project. To create your project from this template, start eclipse and select:

File -> New -> Project -> Maven Project
On the Archetype screen, select the archetype: opentravel-touractivity-ws-service-archetype. If the artifact doesn't appear, click the 'add archetype' button; GroupId: org.jibx.schema.org.opentravel._2012A.ws, ArtifactId: opentravel-touractivity-ws-service-archetype, Version: 1.0.6 (Not the version show in this image)

On the Project screen, enter your group, artifact name, and version.

You can enter anything you want here. You will need your project group, artifact, and version when you deploy your project.
Click finish to build your project.

This project has two files.

The blueprint.xml file is the configuration file. This blueprint tells the system to register this service to handle opentravel touractivity messages.

The source file handles the actual messages. This code is expected to process request messages and return a response.

If you look at the source code, you will find the method:
public AvailRS avail(AvailRQ request)
I have included some sample code that returns availability and pricing for several fake tours. This is where you would access your inventory and pricing and populate the return message.
The cool part of using a java representation of the opentravel xml message is you can use all the eclipse programming shortcuts, such as auto-complete and documentation display. All the comments and xml snippets from the (complex) opentravel schema have been transferred to the java source code. Try to ctrl-click one of the request or response method names and you will be looking at the java source code model of the xml message. Nice!

To build the project, right-click the project name in the project explorer and select Run as -> Maven install

Now we are ready to deploy this code.

For this example, I'll use servicemix. You can also use any one of the enhanced esb servers such as Talend or Fuse. In fact, this code uses only open specifications, so you should be able to run it with minor configuration changes on almost any java app server.

Download servicemix, unzip, and run it:

tar zxvf apache-servicemix-4.4.2.tar.gz
cd apache-servicemix-4.4.2
bin/servicemix

Now start the RESTful server and the SOAP server. These servers are configured to send incoming messages to a service registered to handle touractivity messages. (The blueprint.xml file does this) Type these command into the servicemix console.
features:install obr
obr:addurl http://www.jibx.org/repository.xml
obr:deploy org.jibx.schema.org.opentravel._2012A.touractivity.ws.soap
obr:deploy org.jibx.schema.org.opentravel._2012A.touractivity.ws.rest
# Enter the actual group/artifact/version of your project here:
install mvn:org.jibx.schema.org.opentravel.ws/org.jibx.schema.org.opentravel._2012A.touractivity.ws.service/0.0.1-SNAPSHOT
# Note: Due to an OSGi issue, you will need to shutdown and restart servicemix here (ignore any errors on startup):
shutdown
bin/servicemix


# After it starts back up, start your services:
start org.jibx.schema.org.opentravel._2012A.touractivity.ws.service
start org.jibx.schema.org.opentravel._2012A.touractivity.ws.soap
start org.jibx.schema.org.opentravel._2012A.touractivity.ws.rest

Give it a moment to start, then try out the rest service by clicking this link:
http://localhost:8181/cxf/touractivity/avail/cityss/2012-04-12

You can test the SOAP service using soapui. The wsdl location is http://localhost:8092/soap/touractivity?wsdl.Try sending this soap message:

<soapenv:Envelope xmlns:soapenv="http://schemas.xmlsoap.org/soap/envelope/">
   <soapenv:Header/>
   <soapenv:Body>
      <ns:OTA_TourActivityAvailRQ TimeStamp="2012-04-19T05:16:51.353Z" Target="Production" Version="1.0"
           xmlns:ns="http://www.opentravel.org/OTA/2003/05">
         <ns:TourActivity>
            <ns:BasicInfo TourActivityID="CITYSS"/>
            <ns:Schedule>
               <ns:StartTime>2012-05-11</ns:StartTime>
            </ns:Schedule>
            <ns:ParticipantCount Quantity="1"/>
         </ns:TourActivity>
      </ns:OTA_TourActivityAvailRQ>
   </soapenv:Body>
</soapenv:Envelope>
Your response should look something like this:
Voilà

Wednesday, December 14, 2011

XML Data Binding for Java on Android using JiBX

JiBX is an excellent tool for binding XML data to Java objects on the Android platform.

- JiBX is fast!
- JiBX has a small footprint (it will add only 60KB to your .apk)
- JiBX uses the Android XMLPull parser by default
- It's easy to use!

We all appreciate the advantages of being able to use java classes to do data manipulation. person.setFirstName("Don"); is much easier then messy DOM manipulation: document.getElementsByTagName("first").item(0).appendChild(document.createTextNode("Don"));

Let's create a sample project.

First, create java bindings for your XML schema using JiBX, or select a pre-build schema library.

For this example, we'll use a pre-built binding from the JiBX schema library. Our sample xsd file is an XML definition which includes a person's first and last name.

Click here to see our sample schema in the JiBX library. You may want to take a look at the schema and the JiBX generated java source code.

Download the java jar file by right-clicking this
link and select 'save as'.

Next, download the jibx runtime jar file by right-clicking this link and select 'save as'. We'll need these jars shortly.

Now we're ready to create our Android application. First you need to install eclipse and the Android SDK.

From Eclipse, select New -> Project -> Android Project.

I'm calling this project 'jibxapp'.

On the next screen, select your target api.


Finally, enter your java package name.


You project should appear in your workspace.

Navigate to jibxapp -> res -> layout and double-click main.xml to bring up the form editor.


Add a button, two medium static text fields, two data text boxes, and a multi-line text box so your screen looks something like this:


You may want to test your Android emulator here by right clicking the project name and selecting 'Debug as' -> 'Android Application'.

To add your java binding and the JiBX runtime, right-click your project name and select properties. Click 'java build path' -> Libraries -> 'Add external jars' and add the two jars that we downloaded earlier.


Navigate and open your Android source code file.


Add this test code to your java source file:

package org.jibx.android.test;

import java.io.ByteArrayOutputStream;
import java.io.StringReader;
import java.io.UnsupportedEncodingException;

import org.jibx.runtime.BindingDirectory;
import org.jibx.runtime.IBindingFactory;
import org.jibx.runtime.IMarshallingContext;
import org.jibx.runtime.IUnmarshallingContext;
import org.jibx.runtime.JiBXException;
import org.jibx.schema.org.jibx.sampleschema.person.Person;

import android.app.Activity;
import android.os.Bundle;
import android.view.View;
import android.widget.Button;
import android.widget.EditText;

public class JibxappActivity extends Activity {
/** Called when the activity is first created. */
@Override
public void onCreate(Bundle savedInstanceState) {
super.onCreate(savedInstanceState);
setContentView(R.layout.main);

mPickDate = (Button) findViewById(R.id.button1);
mFirstName = (EditText) findViewById(R.id.editText1);
mLastName = (EditText) findViewById(R.id.editText2);
mTextBox = (EditText) findViewById(R.id.editText3);
// add a click listener to the button
mPickDate.setOnClickListener(new View.OnClickListener() {
@Override
public void onClick(android.view.View v) {
doJibxTest();
}
});
}

Button mPickDate = null;
EditText mFirstName = null;
EditText mLastName = null;
EditText mTextBox = null;

/**
* Add the test table records.
*/
public void doJibxTest() {
Person person = new Person();
person.setFirstName(mFirstName.getText().toString());
person.setLastName(mLastName.getText().toString());


String xml = marshalMessage(person);
mTextBox.setText(xml);

Person personOut = (Person) unmarshalMessage(xml);

mPickDate.setText(personOut.getFirstName() + ' ' + personOut.getLastName());
}

/**
* Marshal this message to xml .
*
* @param message
* @param system
* @return
*/
public final static String STRING_ENCODING = "UTF8";
public final static String URL_ENCODING = "UTF-8";
String bindingName = "binding";

public String marshalMessage(Object message) {
try {
IBindingFactory jc = BindingDirectory.getFactory(bindingName, Person.class);
IMarshallingContext marshaller = jc.createMarshallingContext();
ByteArrayOutputStream out = new ByteArrayOutputStream();
marshaller.marshalDocument(message, URL_ENCODING, null, out);
return out.toString(STRING_ENCODING);
} catch (UnsupportedEncodingException e) {
e.printStackTrace();
} catch (JiBXException e) {
e.printStackTrace();
}
return null;
}

/**
* Unmarshal this xml Message to an object.
* @param xml
* @param system
* @return
*/
public Object unmarshalMessage(String xml) {
try {
IBindingFactory jc = BindingDirectory.getFactory(bindingName, Person.class);
IUnmarshallingContext unmarshaller = jc.createUnmarshallingContext();
return unmarshaller.unmarshalDocument(new StringReader(xml), bindingName);
} catch (JiBXException e) {
e.printStackTrace();
}
return null;
}
}


This program takes the First and Last Name entered, plugs them into a java data object, marshals the object to xml, and unmarshals the xml back to a data object and extracts the data from it. I made this program very simple, of course you would not do this kind of processing in the main thread.

Run your application by right clicking the project name and selecting 'Debug as' -> 'Android Application'. Enter your first and last name and click the button on the top.


Voilà!

Monday, January 31, 2011

Installing git-web on a java web server

Installing git-web on a java web server such as tomcat or jetty is pretty simple. All java web-servers have the capability to run cgi scripts such as git-web.

The difficult part of installing git-web is setting up all the configuration.

First, install git-web using your linux installation tool such as yast, yum, rpm, etc. Your install will assume you will use the apache web server.

Now for the hard part. Every linux distro installs the files in different locations. Here is where my files are installed:
The git-web config file:
/etc/apache2/conf.d/gitweb.conf (This tells git-web where your repositories are)
The git-web install directory:
/usr/share/git-web (The git-web cgi script and web files)

The next step is to get git-web working. There are a ton of tutorials out there. Most of them are pretty bad. I would just open up the gitweb.cgi file in a text editor and edit the parameters.

You will probably want to change the $projectroot variable to point to your git repository location.

Once you get git-web working, you are ready to install it in your java web server.

First, create a war directory (mine is called git-web) and move the git-web files to these locations:


Next, create the web.xml file in the WEB-INF directory. It should look like this:

<?xml version="1.0" encoding="UTF-8"?>
<web-app id="WebApp_ID" version="2.4"
xmlns="http://java.sun.com/xml/ns/j2ee"
xmlns:xsi="http://www.w3.org/2001/XMLSchema-instance"
xsi:schemaLocation="http://java.sun.com/xml/ns/j2ee http://java.sun.com/xml/ns/j2ee/web-app_2_4.xsd">
<servlet>
<servlet-name>cgi</servlet-name>
<servlet-class>org.apache.catalina.servlets.CGIServlet</servlet-class>
<init-param>
<param-name>debug</param-name>
<param-value>0</param-value>
</init-param>
<init-param>
<param-name>cgiPathPrefix</param-name>
<param-value>WEB-INF/cgi-bin</param-value>
</init-param>
<load-on-startup>5</load-on-startup>
</servlet>
<servlet-mapping>
<servlet-name>cgi</servlet-name>
<url-pattern>/gitweb.cgi</url-pattern>
</servlet-mapping>
</web-app>

Voila! Install this war location on your java web server and git-web is ready to go:

Thursday, January 07, 2010

Creating an OpenTravel Server

Here are step-by-step instructions for setting up a server to process messages from the OpenTravel project.

In this tutorial you will create a module to service the OpenTravel "Ping Request".

Prerequisites:
  1. Download my (tiny) opentravel-webservice framework from the OpenTravel tools project and unzip it. There are several other open source tools in this project that you may want to look at... or contribute to!
  2. Make sure the Java sdk is installed.
  3. Install Apache Maven. This program auto-installs all the build tools and libraries that you will need. Make sure mvn is in your path.
  4. Install a osgi server. I prefer the fuse distribution of Apache Servicemix. Almost all web servers can handle osgi modules, but servicemix has some cool capabilities and tutorials (I based this tutorial on their getting started tutorial).
  5. Install soapui (Optional - If you prefer another web services client, use it). You may have also noticed there is a soaui test framework on the OpenTravel Tools site.
Now you're ready to get started!
  1. Build and Package the webservices modules:
    > cd {your path}/opentravel-webservice
    > mvn install
    (This may take a while the first time you run it. Ignore the warnings)
  2. Install the web service module and the soap interface to your web server:
    > cd {your path}/apache-servicemix-{4.1+ version}
    > bin/servicemix
    karaf@root> features:install cxf-osgi
    (Make sure the apache open source services framework is installed)
    karaf@root> osgi:install -s mvn:org.apache.servicemix.cxf/org.apache.servicemix.cxf.transport.osgi/4.2.0-fuse-SNAPSHOT
    (Install the apache http osgi transport)
    karaf@root> osgi:install -s mvn:org.opentravel/opentravel-webservice-se
    (Install the opentravel web service module that you just built)
    karaf@root> osgi:install -s mvn:org.opentravel/opentravel-webservice-bc
    (Install the opentravel web service soap binding module that you just built)
  3. Test it! Check out the response when I sent this Ping Message using soapui (in a new shell):
    > cd {your path}/soapui
  4. > chmod a+x bin/soapui.sh
  5. (Only do this the first time)
  6. > bin/soapui

  7. File -> New WSDL Project
    The url for your WSDL file is: http://localhost:9090/cxf/openTravelService?WSDL


Now try sending a message. Open the tree openTravelBinding -> PingIncommingRequest -> Request and Paste in this simple ping message:

<soapenv:Envelope
xmlns:soapenv="http://schemas.xmlsoap.org/soap/envelope/"
xmlns:ns="http://www.opentravel.org/OTA/2003/05">
<soapenv:Header/>
<soapenv:Body>
<ns:OTA_PingRQ Target="Production" Version="1.005">
<ns:EchoData>Hello</ns:EchoData>
</ns:OTA_PingRQ>
</soapenv:Body>
</soapenv:Envelope>

Voilà, You've been pinged!


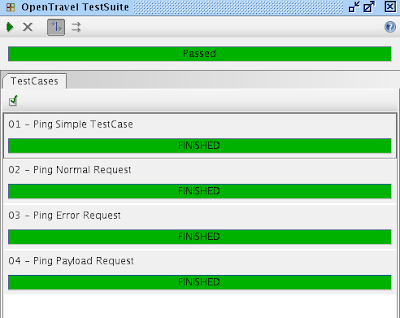
Now you're probably asking yourself if this really creates valid message. Well, let's test it. The ota-tools project has a great test sub-project called ota-soapui. Just open the project in soapui and change the endpoint destination of the four test cases to http://localhost:9090/cxf/openTravelService


Now open the test suite and hit the run button. Cool, all the tests are successful!


This project is a great starting point for your OpenTravel implementation or test project.

Please leave a comment if would like more blogs on this subject... or if you have any questions or recommendations!

Friday, February 27, 2009

Enabling Java Web Start on Linux Firefox

To Enable Java Web Start on Linux Firefox:
1. Remove the IcedTea java plugin (libjavaplugin.so or javaplugin.so) link in /usr/lib64/browser-plugins. (or lib for 32 bit systems)
2. Create a link to the sun java plugin in the /usr/lib64/browser-plugins directory:
ln -s /usr/local/java/jdk/jre/lib/amd64/libnpjp2.so libnpjp2.so

(Use your java path)
That's it!
To make sure your plugin in installed type:
about:plugins

in the firefox address window.
To test the plug-in using a jnlp webstart applet, Click the 'Biorhythm applet' icon on this page:
http://www.donandann.com/bio/
Voila!
If webstart stops working, it is probably due to an update adding back the icedtea link. Just delete the link and webstart will work again.

Sunday, September 14, 2008

Creating jaxb files from the opentravel schema

Probably the easiest way to deal with complicated xml documents is to use the jaxb tool from java. jaxb converts a schema definition from .xsd format to java classes. If you are trying to use jaxb on the opentravel.org schema there are a few gotchas:
  • First, since the schema is so large, there are a few places where there are duplicate element names.
  • Second, since the schema was not developed with jaxb in mind, there are a few element names (such as 'class') that are not legal in java.
Luckily, I wrote a utility that makes it a lot easier to use jaxb, called ota-schema-tools. This is part of the open source ota-tools project. You can download these tools at the sourceforge project page. After you have downloaded the tools, unzip them into a directory.

After a few quick steps, the schema tool is ready to go:
1. Download the sch
ema(s) that you want to use from opentravel.org and drop it in the ota-schema-zip-files directory:

2. Edit the ota.xsd file in the ota-schema-tools/config/2008A directory to include only the schema you will need (or leave it alone to compile all the schema). For example, here I only want to use the OTA_Ping messages:

3. Run the schema tool:
If jaxb is not in your classpath, you will need to tell ant where it is wi
th the -Djaxb.home=/location-of-jaxb-home flag. Also, if you are compiling a lot of schemas, you will have to set the ANT_OPTS=javac-options property. Here is what I type:
ota-schema-tools> export ANT_OPTS=-Xmx512m ota-schema-tools> ant -Djaxb.home=/usr/local/java/web/glassfish/ dist

When I run this command I get the error: OTA_TourInformation.xsd and OTA_RailAvailRS.xsd is not a part of this compilation.
No problem. The jaxb configuration file is set up to fix problems in the entire schema. Just remove these lines from the ota-schema-tools/config/2008A/jaxb/binding.xjb file:

I deleted these highlighted lines. Now run this line again from your command prompt:
ant -Djaxb.home=/usr/local/java/web/glassfish/ dist
Voila! Your schema are compiled and neatly packaged in a opentravel2008a.jar file.

Now that wasn't that hard, was it!

Friday, September 12, 2008

awstats web site statistics for glassfish

awstats is a open source web server log analyzer. Glassfish is an open source java-based web-server. Click here to check out the statistics on my two glassfish domain servers: domain1 domain2. Of course you will restrict access when you deploy this.

To get the awstats package to work with glassfish:
  1. Download and untar awstats (to /usr/local/awstats)
  2. Follow the instructions for installing awstats and run the configuration utility.
    Remember to create the /etc/awstats/ and /var/lib/awstats/ directories and set write permission.
    Edit the config file (/etc/awstats/yourconfigfilename) and change the LogFile property to:
    LogFile="sed -e 's/"\([0-9\.]*\)"/\1 - -/g' -e 's/"\([^"]*-0800\)"/[\1]/g' /usr/local/java/web/glassfish/domains/domain1/logs/access/server_access_log.%YYYY-0-%MM-0-%DD-0.txt |"
    where "/usr/local/java/web/glassfish" is the location of your glassfish server. Also remember to change the time zone offset (mine is -0800) to your timezome offset.
    Change the DirIcons property to:
    DirIcons="icon"
    You will probably want to change your SiteDomain and HostAliases properties to match your domain name.
    I got this info from Glen Smith's blog, Thanks!
  3. Open your glassfish admin page (http://www.yourserver.com:4848), go to configuration -> http service and click the Access Logging enabled box.
    Click on the Access Log Tab and enter:
    %client.name% %datetime% %request% %status% %response.length% %header.referer% %header.user-agent%
    in the Format text box.
    This makes your log format similar to the apache log format
  4. Go you your awstats/wwwroot directory and create a sub-directory WEB-INF
    Create a web.xml file in this directory that contains:

    <?xml version="1.0" encoding="UTF-8"?>
    <web-app id="WebApp_ID" version="2.4"
    xmlns="http://java.sun.com/xml/ns/j2ee"
    xmlns:xsi="http://www.w3.org/2001/XMLSchema-instance"
    xsi:schemaLocation="http://java.sun.com/xml/ns/j2ee http://java.sun.com/xml/ns/j2ee/web-app_2_4.xsd">
    <servlet>
    <servlet-name>cgi</servlet-name>
    <servlet-class>org.apache.catalina.servlets.CGIServlet</servlet-class>
    <init-param>
    <param-name>debug</param-name>
    <param-value>0</param-value>
    </init-param>
    <init-param>
    <param-name>cgiPathPrefix</param-name>
    <param-value>cgi-bin</param-value>
    </init-param>
    <load-on-startup>5</load-on-startup>
    </servlet>
    <servlet-mapping>
    <servlet-name>cgi</servlet-name>
    <url-pattern>/awstats.pl</url-pattern>
    </servlet-mapping>
    </web-app>
    Afterwards, cd to the wwwroot/cgi-bin directory type chmod a-w *.pl just to be careful.
  5. Now, install this as a web server in the glassfish admin screen (http://www.yourserver.com:4848)
    Applications -> Web Applications -> Deploy
    And deploy the web server directory: /usr/local/awstats/wwwroot. Make sure your context root is awstats.


  6. Try to invoke the servlet as it's described in the awstats documentation:
    http://www.yourdomain.com/awstats/awstats.pl?config=yourconfigfilename
    You should see the awstat config data. Cool!